Showing posts with label Lightroom. Show all posts

Friday, 23 March 2012

Lightroom snapshots

What purpose the snapshot feature in lightroom? I asked myself that quite a lot as I was using virtual copies to make my image variations (such as mono and colour versions). I still don't fully know exactly why one might use snapshots rather than virtual copies other than what I've got below.

I'll start with what a snapshot is. It's a record of all the develop settings at any point you choose to record it - you could do this before experimenting with a really dramatic look or a really warm/cool look or a mono conversion and get straight back to where you started experimenting from. You can also do a few different mono conversions on an image. A very useful thing you can do with them is to do your initial crop (the first thing I do after culling the crap) and create your starting point snapshot. I know you can use the history panel and select the import if you want that state, but for wonky horizons (a common thing for me), I don't want that as my starting point. Now you've got your starting point snapshot (I call this "cropped"), what you can do is use it in your before/after comparisons - the "\" key. When you're making changes, especially subtle changes, doing the before/after comparisons can be very useful. Right, what does this waffle have to do with snapshots? You can right-click on the snapshot and select "Copy Snapshot Settings to Before". This means that instead of my wonky horizon in the before, I get the straight version to compare so only the changes in colour or contrast (or whatever) show. Now, that makes the before/after comparison tool useful for those of us who don't get the horizon straight all the time. It's also very useful if you shot an image knowing that you'd crop it into, for example, a square format. Again, make the crop first and snapshot it then use that for your before/after comparisons.

Anyway. Here's how I use snapshots when choosing to do these rather than making use of virtual copies.

  • Import the images into LR
  • Crop as required
  • Snapshot, name "cropped"
  • Make WB corections
  • Make any basic exposure corrections
  • Snapshot, name "exposure corrected"
  • Either edit in another programme for retouching (if required) and export.
  • If a customer buys a print/product, I make a new snapshot named "customer version" so that even if I lose track of the exported jpg's, I still know exactly what the image looked like when the customer bought it.
Hope this has helped in how to make use of the snapshot feature. I'm sure there are more uses, but for variations of an image which I want to keep (sometimes a mono image and a colour version), I tend to use virtual copies as I can see at a glance what I have in the catalogue.

Monday, 19 March 2012

Lightroom slowdown - purge the cache

What do you do when lightroom begins to slow down a little? I had this problem around the new year. I'd optimised the catalogue and was at the point of splitting the catalogue into sections; keep the landscape stuff separate from the portrait stuff from the family stuff. Then I came across the option to purge the cache in the preferences.

When I did that, the whole lightroom interface speeded up by quite a lot, so I can only think that others will have had the same issue and that means me making a post about it to show how I did it and hopefully help someone out.

Step by step guide:

Hit Ctrl-, (hold donw the control key and press the comma) or Cmd-, on mac to get the preferences dialogue box up. This can also be found on the edit menu on windows or the lightroom menu on mac.
Click the tab labelled "File Handling" 


Then click the button labelled "Purge Cache"


Once this is done, a quick re-start of lightroom should have you back up and running. Note that you will have to rebuild the previews of previous imports as this will get rid of them - the previews, that is, not the images in the import.

You may notice in that last screenshot that I have a large cache set rather than the paltry 1.0 GB which was the default. This ensures that I don't have too many issues with LR having to rebuild previews if I go back a couple of shoots. The default 1.0GB holds a lot of previews, but it soon fills up when you're using a 5DII.

Hope this helps someone out at some point :)

Friday, 16 March 2012

Finding just the images which have adjustments

A query elsewhere about how to find just the images the photographer had made adjustments to made me think about smart collections (again). What he wanted was to be able to find the images he'd altered in LR 3 and export just those to a new catalogue to import into LR4 which he had just purchased.

This is actually a simple thing to do if you use smart collections. (If you don't use smart collections, I suggest you make a start on them because they're very powerful.)

Anyway, to achieve this, scroll down to the collections panel in either library or develop module (you can't create them in slideshow, print or web modules) and click the plus symbol to the right of the word collections. From the menu which appears,

Select "Create Smart Collection"

Up pops the box in the next screenshot in which you need to click the condition dropdown (highlighted):

And select from the large menu:
The option "Has Adjustments". This will return you to the previous box. You now need to click on the rule dropdown:
And select "is true" if it isn't already selected by default (mine was)

And that's it. If you want to find every image which has an adjustment made to it in LR 3, use the power of smart collections.

HTH somebody.
Matt

P.S. I'll leave you with an image I made recently of which I'm rather proud :)


Wednesday, 7 March 2012

Lightroom auto advance

Still running lightroom 3 here even though LR 4 is now released and at a very attractive price too!

Anyway, the reason behind this post is that I recently had a problem with the computer which forced a reinstall of the OS and subsequently LR too. Not a problem as the catalogue was intact (although not most recently backed up - a situation to remedy) and just opened it with the fresh install of LR.

Nice clean fresh install of the OS and programmes means the computer has speeded up a tiny bit but one thing was bugging me about my time in LR; the auto-advance when I rated/picked/coloured an image. Now, I know that the auto-advance worked before and I was so used to it that I was completely thrown when it didn't work. Could I remember how to get it working? Not for a while until I knocked the caps-lock key and it started working. I hate having the caps-lock key on though, so I knew this wasn't what was doing it previously.

A search of various support fora told me multiple times that using caps-lock or holding the shift key while setting the flag or rating would do it, but that wasn't what I did before. Cue some searching of the preferences dialogue; to no avail, it isn't in there. More searching told me it's in the photo menu, but I couldn't find it and was scratching my head for a moment until a lightbulb lit. The menus are different in each module and I was in Develop and something like auto-advance is an organising feature, so that would logically be in the Library module. A quick switch to that and there it was in the photo menu: an option to auto-advance about three quarters of the way down.


If you're at all interested in the image in that screengrab, it's the Kincardine Bridge in Scotland. Shot from the banks of the Forth looking downriver.

Monday, 12 December 2011

Ethereal mono conversions

I know we have a post with mono conversions in it already, but that was to do with using the split toning module to give a touch of warmth to our images.

This is about making the images a little different in the mono conversion.

Have you seen some of the ethereal looking conversions out there? Some of the really bright striking images? So have I! I also wanted to learn how to do them in just lightroom without having to go into PS and run an action, so I played with LR and came up with a bit of something which does what I want relatively quickly.

Just as a demonstration, and please don't laugh as your images are very likely to be better than mine, here's a before image of beautiful Becky, a model local to me (and very good she is too). I very much enjoy shooting with her as she's good fun on the shoot and works hard to help get what you wish to achieve.


Note the sliders in the basic panel and how there's no change in exposure (the reason for this will become clear).

A nice enough image, I hope you'll agree, but I wanted to change this around a little and make it something different and the ethereal mono conversion is what I chose.

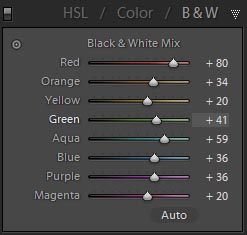
I used the HSL / Color / B&W panel on the B&W part for the cnversion to mono, but instead of it being a plan desaturation, I shifted the sliders around a little. As you can see from the original, the blue of her jeans and red of her t-shirt would make for relatively dark tones in a straight conversion. That dictated the movement of sliders to make those tones brighter.

Blues and reds were the biggest movements to brighten things up in those darker tones.

This was the image when that was done, and please note the exposure and brightness sliders are the same; playing with the tones in conversion means that we don't have to globally brighten the image to make it overall brighter and we now don't have massively clipped highlights (there's a tiny difference on recovery between the two; the mono has 10 and the original has 9)


OK, so it's beginning to look pretty bright, but there's no "glow" or ethereal feel yet. It just looks very bright and overexposed (but not clipped). Now comes the adding-glow bit, and it really is simple! It can be done in a couple of ways depending on what your image looks like and how close tot he face you are cropped. In this one, we're not tight in, so we can use a global effect; take the clarity slider and move it all the way to the left. See how it adds almost a glow? Right. Doing this on anything other than a very bright image which you want to add a glow to is very often a nasty effect. I do mean really nasty! On many bright images like this it can be nasty too, so watch what you apply this to! The other way of adding the glow is to press K to get the adjustment brush and set all sliders to 0 apart from clarity which you take all the way left to -100. Set the flow of the brush to about 25 and paint over the areas you want the glow added. Using such a low flow means you can add more of the effect by painting over again. If you want even more control, set the flow lower, but that would negate some of the speed increase you get from doing this in LR.

If you prefer to add all your effect in one go, keep the flow at 100 and apply the whole effect in one stroke. For the brave of heart and those with a little time on their hands to experiment with.

A final image (globally added glow) is below. If you dislike it, please tell me; conversely, if you like it, I'd like to know. If you try this effect effectively on your own images and are proud enough to show them, please link to them in the comments.


HTH someone,
Matt

Friday, 2 December 2011

Lightroom develop module

Lightroom's develop module is the part of the programme where most of it's users spend the majority of their time. This is very understandable as it's the heart of the raw processing and where most adjustments to images are made.

When you're in the develop module (shortcut d on your keyboard), you have panels on the right (press f8 if it's disappeared) starting with the histogram and the toolbar (crop tool, spot removal, redeye correction, gradient tool and the adjustment brush). Beneath this are the panels proper: Basic, Tone Curve, HSL / Color / B & W, Split Toning, Detail, Lens Corrections, Effects and Camera Calibration.

Out of these, the panels I use most in order are: Basic, Detail, Tone Curve, HSL, Effects, Split Toning, Camera Calibration and lastly Lens Corrections.

That's just my own way of working and if you have a lens which gives you funky distortions that you want some assistance in getting rid of, the Lens Corrections might actually be much more use to you than it is to me. I don't own anything that distorts really badly and if I'm shooting wide, I tend to keep important things away from the edges of my 24-105. This means I really don't have that much use for this module. You may, of course, be totally different. And it's really good to know that there's variety in the world!

I'll make a post or two on the different panels and how I use them; starting with the basic panel which is the one I think most of us should have ready for every image even if we have got everything right about it - something I don't achieve very often!

I'll leave you with an image which required only the tiniest bit of tweaking in the develop module; it got a small adjustment to exposure as I was 2/3 stop out on my exposure. His Mum loves the image and has given me permission to use it for marketing material.


All the best

Monday, 28 November 2011

The raw files look flat in the modules when they were vibrant in the import dialogue

I have seen more than a few people asking the question about why their files look lovely and vibrant on the camera screen and in the import dialogue (and as thumbnails in explorer or finder), but when they've been imported to LR, they become dull and flat.

The answer, apart from canon raw files being flatter than those from nikons (canon user here so it's not manufacturer fanboy bias), in my experience (5d2 raws compared to d700 raws) is that all those places show a rendering of the embedded .jpg file in the raw data.

All the raw files that I'm aware of, and if anyone reading this knows different, please correct me by linking to your information, have a jpg rendering of the image embedded within the raw data and this is what the camera screen displays, the OS file managers show and the import dialogue reads for display. Once the images are imported into the catalogue, the raw data is used to build the preview (unless this option has been altered from the default) and to build the image you see on screen when processing your images (if preview building is turned off) and when you zoom to 1:1 in loupe view.

"Loading" as the beautiful Fredau is rendered by LR.
The reason they're different is that your camera will have applied some kind of processing to the data before saving the jpg preview in the raw file. Check your picture styles on the camera for what processing is applied and you can then make yourself a preset to do that kind of thing as a develop preset in LR should you choose.
And I couldn't have a pixellated version of Fredau in this post without posting a proper image of her. She's far too beautiful and talented as a model to ever be left as a pixellated half-render.


HTH someone. Happy shooting and editing.
Matt

Thursday, 24 November 2011

When Lightroom tells you that it can't find the file you're trying to work on

Many of us have come across LR telling us that 'The file named "xxxxxxxxxx" is missing or offline'


and the first time it happens is a moment of dread; especially if we're unfamiliar with LR and we think it's eaten one of our precious images. If you do get this message on your screen (the above is a screengrab from the develop module, but loupe view in the library module shows the same), LR has a mechanism for finding the files and getting things back in order for you. Heaqd to grid view in the library by pressing G on your keyboard and make sure you're highlighting the file which is missing. On there, you'll see the following "badge" on the thumbnail highlighted in red:


Clicking on that brings up a dialogue box which asks if you would like to locate it. If you moved the files outside of LR (for example in explorer or the finder if you're running an apple pc) and you know where you moved the file, then just use the dialogue to navigate to where you moved the file. Simple, eh?!

A simple solution to this problem not being a problem, is to only use LR to move your files once they're in the catalogue.

There is another one which can come up for missing files and involves you having moved an entire folder from outside the LR interface. This is much more tricky, much much more tricky. Actually, it isn't. It works in a very similar way.


You get the question mark (above) showing on the folder in your Folders panel and every file in the folder shows the missing file badge. This is solved by right clicking on the offending icon, and it is offensive to know you've been a muppet again and moved a folder outside of the LR interface, and selecting "Find missing folder". You again get a dialogue box up in which you can just navigate to where you moved the folder.


The simple solution to this is the same as for a missing file, just don't move folders around outside of the LR interface once you've imported images from it into your LR catalogue.

The above situation for missing folders can happen if you've upgraded the drives in your computer and moved your "Pictures" folder to one of the new drives, just follow the above instructions for the root folder and all folders will then reappear in your LR folders panel instead of one by one. If you don't see the root folder ("Pictures" on windows PC, I don't own an apple PC, so users of those can identify the root folder themselves, if you've left the standard naming conventions and not moved things about), right click on the highest level folder (or one of them) and select "Add parent folder" to display it. Having the root folder of your images displaying by default can help in other ways for organising/finding your images, but that's beyond what I'm writing about here.

HTH in some way for someone,
Matt

Wednesday, 16 November 2011

This isn't all about Lightroom, you know

The previous posts have been about lightroom, my favourite photo software, but there's more to editing than lightroom (allegedly). Some people actually use other software and find it useful.

Any jesting aside, sometimes there are edits that just can't be done in lightroom or not done easily. One example of which is if you need the functionality of layers and their blending modes. If you need this, external editing software is required. There is a plugin available for lightroom, which gives this functionality, called perfect layers, from OnOne software, but I've not tried it out, so I can't recommend or otherwise the software.


As we're on the subject of layers and blending modes, when would you use them as a lightroom user? Well, I have no idea as I don't know your images. I know that if I need them, it's when I've been shooting multiple exposures with the camera in one spot and want to put them all together into just one image. such as the one below:

 Is it really so long since I made this? Wow, this was made in 2008.

Anyway, if you need to do something like this and have an image editor on your computer, then ensuring it is set up in your lightroom preferences means you can definitely get to edit your images very easily.
Press ctrl-, (the control key and the comma key) or cmd-, for those with apples to bring up the preferences dialogue and select the External Editing tab.
Once there, the following settings worked well for CS4:

File Format: PSD
Color Space: ProPhoto RGB
Bit Depth: 8 bits/component
Resolution: 300

This saves you ending up with massive tiff files which were a real pain for storage until I found out how to change the settings.

Happy playing in LR and other editing programmes
Matt

Saturday, 12 November 2011

Lightroom again

As I've noted in previous posts, I love the functionality and workflow options that lightroom (LR) gives me.

One of the good things is that I can either export images directly in the size I want via the export dialogue or I can make images for print or display from the print dialogue. Why would I want to do it from the print dialogue when the export works? Consider the case where you want to have your image laid out on a nice background (plain or otherwise) with your logo or name underneath it. That's just one use which springs immediately to mind. Others include making a proof card of images if you want to show your work off to people (or if you're providing nursery photography services). Another is to make album pages; this is fine for either the professional labs or the more consumer focused ones too. An example of why you'd perhaps want to do this is that some consumer labs don't allow you to design the pages with multiple images in their album builder software on the website. This way, you get your multiple images on a page without messing with lots of layers in photoshop.

How to do this? Just a few things need to be checked and/or selected to make this work for you.

First, in the Layout Style panel, select custom package:


Second: make sure that you're printing to a jpg file and not a printer :

Click the little up-and-down arrows and select JPEG File.
This changes the print job panel options. Wherever you're printing your pictures, it's perhaps best to make sure the PPI is set to 300, although my own experience is that sending the files at 240 also works fine.
The other options to look at:
Print sharpening is best to leave at low unless you know whether your chosen lab adds extra sharpening to files automatically. Have a read of their website and find out if you need to sharpen yourself or if some is applied automatically. If they do, low is best, if they don't, I've found with my own images that I don't need to add more than this low setting.

Media type is pretty much as it says on the tin. If you're going to order glossy prints, select that, otherwise, a bit of experimentation is required to get the effect you want.
JPEG Quality: Now then, here's a thing. I've found little difference in the images when I change this down from 100 to 70. I've noticed a difference only if I am getting huge prints. Your own experience may well be different though and a quick email to your chosen lab asking what quality setting they recommend is best. They may not know lightroom though and you may have to experiment.
Custom file dimensions is an important one. I have only come across a few labs which display the print sizes in metric, so set these in standard imperial sizes for the best compatibility. I know it only takes moments to convert from one to the other, but if you've set 300 PPI, then a print size in inches is the easiest way to do things.
Here's an example of the Print Job panel ready to go:


Right, you've set up your "canvas" and now you can place your image or images onto it.

An example below of what I did very quickly. The beautiful young Lady in the images is Becky, a model local to me. I'm much better at taking pictures than I am at designing layouts (as you can tell from the layout here which is just a very quick example of what can be done at it's simplest).

Tuesday, 8 November 2011

Lightroom presets and how to make them

Lightroom (LR) rocks, to borrow a phrase from the TV. I couldn't get by editing my shoots without it nowadays. Everything else is just so much slower.

The very best thing about LR is the preset functionality. If you make something when playing with the sliders which you think you might like to use again, just make a preset so you can. How do you do that? Well, there are plenty of tutorials on how to do so, and I think it might be best for me not to add to the list, so I'll link a few on youtube which I think explains it most easily.

Here is one from FroKnowsPhoto and it does exactly what it says on the tin: How to make a preset. The video is in the link if you'd prefer to watch it direct from the youtube site, or you can just watch it here:


As the presenter notes in the video, its important to only have in your presets the things which make that preset special and not to change everything. This video is for develop presets, but the other modules can have presets made and the principle is the same. I'll cover some print module presets in future posts

Wednesday, 2 November 2011

A post with a few things in it

I'm a lightroom (LR) user. I'm hooked. There is no way I could get through editing any of my shoots without using the programme. It just blows away anything else I've tried for workflow. One of the best things about LR is the ability to use presets. Not just to use, but to be able to create them easily and then apply those presets for future (or reprocess past) images.

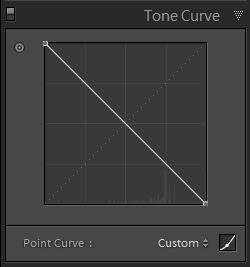
If you run version 3 or above, the ability to use a point curve is a huge advantage over v2 and below and has one huge advantage which I've come across and that is the ability to process scanned negatives without having to go into PS to invert the images. Just make a point curve preset which inverts the curve line to make it look like this:
 And when you click on it, the image becomes a positive.

To save you the trouble of making a preset to do this, I've made some LR presets already and they're available here: Curve Effects - more than just a negative There are a few other effects in there, including some for solarisation, just grab yourself a B&W image to play with those, they don't give too good an effect on colour images, but are fun for the mono ones.

I hope this post and the presets will be helpful to some folks.
Matt

Please note that I made these presets for the 10-10-10 event over on photocreative (the lovely Michael Shilling's site)