I know we have a post with mono conversions in it already, but that was to do with using the split toning module to give a touch of warmth to our images.
This is about making the images a little different in the mono conversion.
Have you seen some of the ethereal looking conversions out there? Some of the really bright striking images? So have I! I also wanted to learn how to do them in just lightroom without having to go into PS and run an action, so I played with LR and came up with a bit of something which does what I want relatively quickly.
Just as a demonstration, and please don't laugh as your images are very likely to be better than mine, here's a before image of beautiful Becky, a model local to me (and very good she is too). I very much enjoy shooting with her as she's good fun on the shoot and works hard to help get what you wish to achieve.
Note the sliders in the basic panel and how there's no change in exposure (the reason for this will become clear).
A nice enough image, I hope you'll agree, but I wanted to change this around a little and make it something different and the ethereal mono conversion is what I chose.
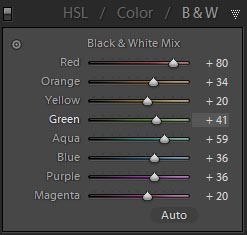
I used the HSL / Color / B&W panel on the B&W part for the cnversion to mono, but instead of it being a plan desaturation, I shifted the sliders around a little. As you can see from the original, the blue of her jeans and red of her t-shirt would make for relatively dark tones in a straight conversion. That dictated the movement of sliders to make those tones brighter.
Blues and reds were the biggest movements to brighten things up in those darker tones.
This was the image when that was done, and please note the exposure and brightness sliders are the same; playing with the tones in conversion means that we don't have to globally brighten the image to make it overall brighter and we now don't have massively clipped highlights (there's a tiny difference on recovery between the two; the mono has 10 and the original has 9)
OK, so it's beginning to look pretty bright, but there's no "glow" or ethereal feel yet. It just looks very bright and overexposed (but not clipped). Now comes the adding-glow bit, and it really is simple! It can be done in a couple of ways depending on what your image looks like and how close tot he face you are cropped. In this one, we're not tight in, so we can use a global effect; take the clarity slider and move it all the way to the left. See how it adds almost a glow? Right. Doing this on anything other than a very bright image which you want to add a glow to is very often a nasty effect. I do mean really nasty! On many bright images like this it can be nasty too, so watch what you apply this to! The other way of adding the glow is to press K to get the adjustment brush and set all sliders to 0 apart from clarity which you take all the way left to -100. Set the flow of the brush to about 25 and paint over the areas you want the glow added. Using such a low flow means you can add more of the effect by painting over again. If you want even more control, set the flow lower, but that would negate some of the speed increase you get from doing this in LR.
If you prefer to add all your effect in one go, keep the flow at 100 and apply the whole effect in one stroke. For the brave of heart and those with a little time on their hands to experiment with.
A final image (globally added glow) is below. If you dislike it, please tell me; conversely, if you like it, I'd like to know. If you try this effect effectively on your own images and are proud enough to show them, please link to them in the comments.
HTH someone,
Matt


No comments:
Post a Comment